How to Play Your Flute
Your new flute has arrived and you haven’t had a lesson yet – what a frustration that you can’t just put it together and play!
This is a short guide to get you started. Your teacher will guide you through each step but will be impressed that you have already grasped the first basics and have a knowledge of how to put your flute together and can give it a go of getting a sound out.
Each teacher has their own “favourite” tutor book and most of these equally have guidance notes on how to get a good sound, and the do’s and don’ts of flute playing.
Putting Your Flute Together
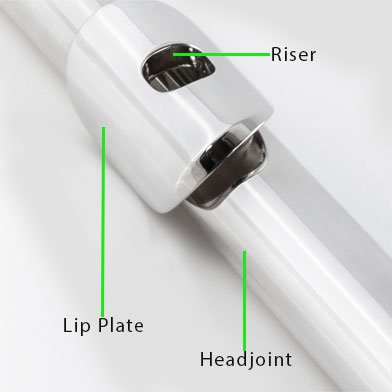
The first task is how to put the flute together. There are three parts of the flute, the head joint (the bit you blow through to make the sound), the foot joint that goes at the bottom of the flute and then the main body of the flute. It can only fit together one way so you can’t get it wrong! The hole in the head joint ideally needs to be in line with the keys on the main body of the flute. The foot joint keys again roughly line up. It is roughly as it is slightly out of line but will depend on hand size as to where it goes. The little finger of the right hand goes on the first key on the foot joint.
Some flutes have little marks on the head joint and main body to show you where to line them up. If you have a curved head joint then this works in the same way. Your flute points out to the right as you hold it up. Your left hand is closest to your head and the right hand is further away.
It is very important when assembling your flute to keep the parts perfectly parallel to each other as you connect them together. If not, you will find over time the joints become tapered and loose. Once this has happened the flute will need a skilled technician to refit the joints.

Getting Your First Sound
 Next is to get a sound. This is probably the hardest part of learning the flute. Once you have a sound it is all under your fingers! The best way to practice getting a sound is to take the head joint off the flute and just use this. The flute works by air passing across the hole in the head joint – it is like blowing across the top of a bottle. Look in the mirror to check the position of your mouth. The bottom of your bottom lip wants to be on the bottom of the hole and then you blow across – don’t try to blow in the hole. It can take ages to get a sound so be patient! Don’t keep blowing time after time – you will feel a bit light headed if you’re not careful! Your lip wants to be in just the right place and once you have found it and got a sound remember where it is. It can come and go so don’t despair.
Once you have it – and you will know if you do! – then put your hand over the end of the head joint and you will get a different sound. Keep doing this until you have a good solid sound that is reliable and you can put the head joint down and pick it up and consistently get the good sound. Tone is an important word in learning the flute – a good tone is a nice sound basically. If it sounds a bit “thin” and not so good it isn’t right. Keep working on this. The mouth position is called the embouchure and all woodwind and brass teachers will talk about having a good embouchure. It is very important and can make all the difference to how you sound all the way through your learning.
Playing The Flute
 So now you have a sound! Put the main body back on the head joint and the foot joint on. Remember which way round to hold your flute – left hand towards your head and right hand further away. Your left hand is towards your face – as if you were going to scratch your nose – and your right hand is the opposite – as if you are going to pick up something. The little finger of your right hand goes on the key at the top of the foot joint – it stays here for all flute playing. Your thumb of your right hand goes under the flute and if you hold your hand as if you were a bear you can see a C shape between your thumb and first finger – this is the correct hand position for your right hand. Your left hand has more to do in the early stages. The left-hand thumb goes on the key behind the main keys – there are two joined together and it goes on the bigger of the two.
The first finger of the left hand goes on the first key and this is B. You will learn B then A then G. They are all in a line (kind of!) the flute has extra keys that give different notes. Your A key is the next but one – it makes sense when you play! Once B, A and G are sorted your right hand then brings in F, E and D. If you have learned the descant recorder the fingering is the same. There are some differences along the way, but nothing major. It is also along the same lines as the alto Saxophone.
Each note poses a very marginal alteration of your embouchure and the lower notes, and higher notes need extra work. The flute has a range of 3 octaves (36 notes) and there are alternative fingerings for some notes. The lowest note on the flute is C and is the equivalent of middle C on the piano. There are more advanced flutes that give you an option of lower notes. There are also different sized flutes for more advanced players – the range is from a piccolo which is a “baby” flute and tiny (the size of a recorder) through to bass flutes which will have a much lower sound. Have an explore on the internet and you will be surprised at how vast the flute family is.